|
|
|
|
| Every logging operation needs work cars for support - water, rail,
ties, ballast, blacksmithing, power - all are very useful. I am
fond of the little 10 foot cars riding on a single truck; they're cute
and useful. This first segment shows how I make the basic
flatcar. Future segments will show how to detail this basic unit
into a variety of specific work cars.
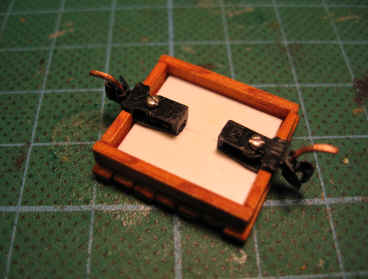
Start with a 15mm x 18mm rectangle cut from 0.040" styrene sheet. From 1/8" x 1/16" basswood strip, cut two end sills each 15mm long and two side sills each 21mm long to fit around the styrene, stain them and glue them to form a rectangular frame. Next, from the same basswood strip cut and stain seven deck boards each 21 mm long. Allow a little variation in length of these boards and lightly sand the tips to bevel them and add some end definition. I've also found that staining the edges with a darker stain provides some definition when the boards are joined side by side. Carefully mark the center point of the side sills and glue the seven deck boards to the top of the rectangular frame, with one of the seven precisely centered. Flip the deck/frame unit over and insert the styrene rectangle into it. Notch the end sills down even with the styrene to accept a MicroTrains 1023 coupler. Next, mark the location of the coupler mounting screws with a pointed tool, then remove the styrene, drill and tap for the MT 00-90 mounting screw. I've found that it helps also to mark the location of these holes on the underside of the deck and carefully drill a blind clearance hole, since the MT screw will extend a little way through the styrene. A dab of white glue under the deck will secure the styrene in place. Attach the MT couplers. At this point, your car will look like Figure 1. An alternative is to use MicroTrains 905 Z-scale couplers. The coupler pockets are smaller and do not require notching the bolster as described below, plus the coupler knuckles are quite realistic on this size car. And, they mate with the N-gauge couplers very nicely.
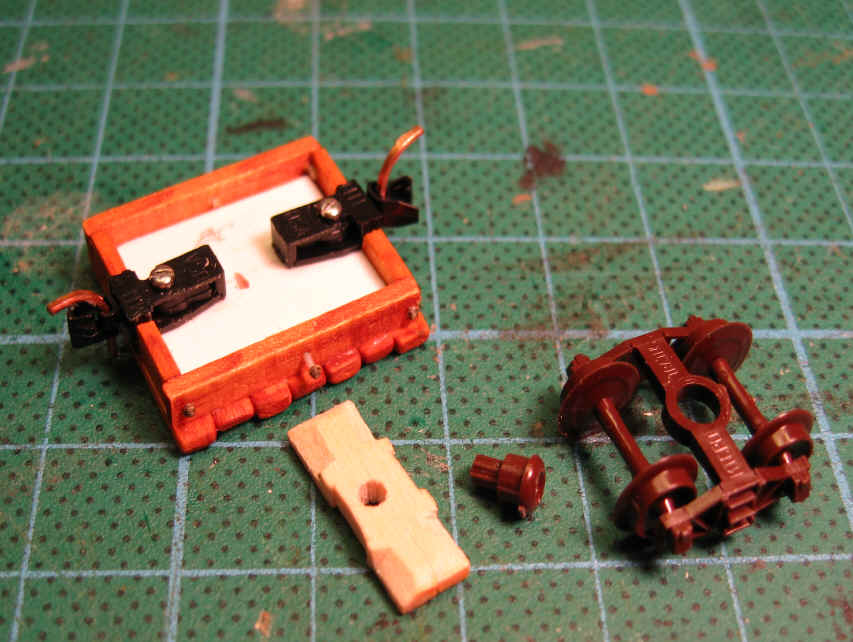
Figure 1 Next, fabricate a bolster. I use two 15mm long strips of the same 1/16" x 1/8" basswood, glued side by side, then notched to clear the back ends of the MT 1023 coupler pockets and angled to clear the wheels of the truck. FIgure 2 shows the bolster ready to install, plus the MicroTrains 1011 archbar truck and one of the supplied mounting pins. Note that the bolster is drilled slightly off-center because the MT truck mounting hole is off-center. The hole is a press fit for the mounting pin and the pin has been trimmed to the depth of the bolster. The truck bolster and frame bolster should touch firmly when the pin is inserted.
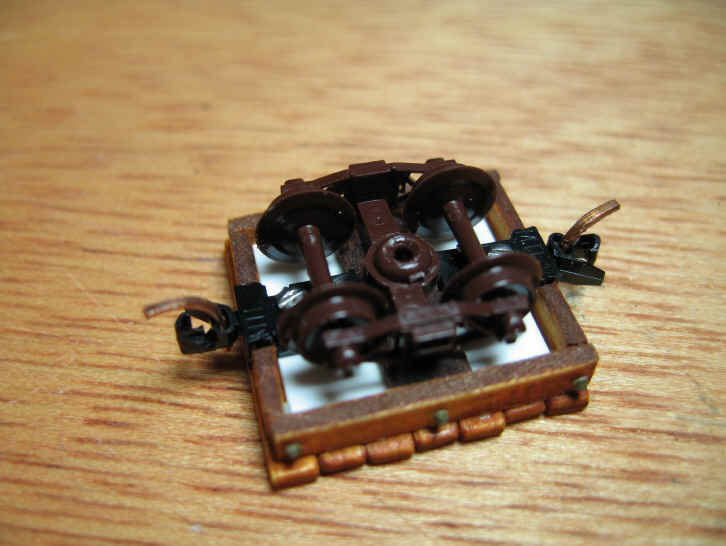
Figure 2 In Figure 2 you can see three of the six Grandt Line 5045 Nut/Bolt/Washer castings that are placed on each side. Drill a number 75 hole for each of these - after you attach the bolster (don't do what I did). Stain the bolster and glue it in place, then drill and insert the N/B/W castings - paint them before inserting to avoid getting paint on the surrounding wood. Finally, press the mounting pin for the truck into place. You may want to secure it with some glue if the fit is not really tight. I've found that my trucks stay put pretty well with no glue at all. You should now have a car that looks like Figure 3. Next time, we'll add details to create several different types of cars.
Figure 3 Parts LIst Thus Far 1/16" x
1/8" basswood strip cut per description |
|
This page last modified 02/20/2007
|